Stride Rite Kids Shoe Size Guide
ADVERTISEMENT
7
6
SIMPLE SIZE GUIDE
5
4
3
LENGTH
WIDTH
DATE
2
LEFT
1
RIGHT
13
12
Place card here.
11
10
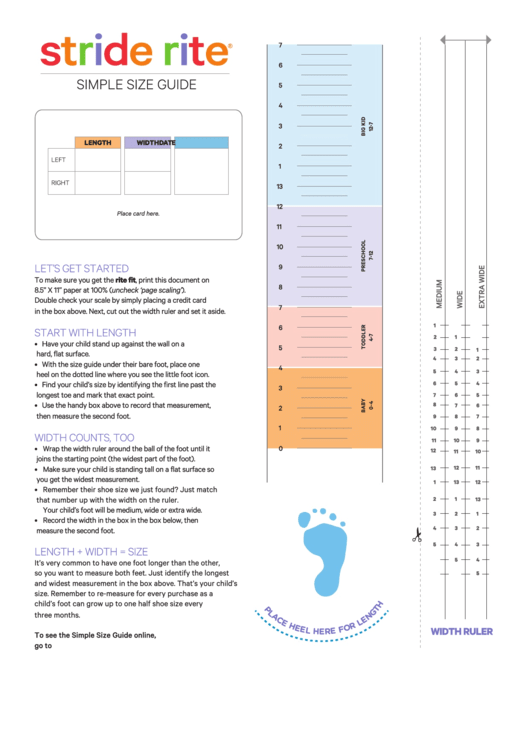
LET’S GET STARTED
9
To make sure you get the rite fit, print this document on
8
8.5” X 11” paper at 100% (uncheck ‘page scaling’).
Double check your scale by simply placing a credit card
7
in the box above. Next, cut out the width ruler and set it aside.
1
6
START WITH LENGTH
2
1
• Have your child stand up against the wall on a
5
3
2
1
hard, flat surface.
4
3
2
• With the size guide under their bare foot, place one
4
5
4
3
heel on the dotted line where you see the little foot icon.
• Find your child’s size by identifying the first line past the
6
5
4
3
longest toe and mark that exact point.
7
6
5
• Use the handy box above to record that measurement,
8
7
6
2
then measure the second foot.
9
8
7
1
10
9
8
WIDTH COUNTS, TOO
11
10
9
• Wrap the width ruler around the ball of the foot until it
0
12
11
10
joins the starting point (the widest part of the foot).
12
11
• Make sure your child is standing tall on a flat surface so
13
you get the widest measurement.
1
13
12
• Remember their shoe size we just found? Just match
that number up with the width on the ruler.
2
1
13
Your child’s foot will be medium, wide or extra wide.
3
2
1
• Record the width in the box in the box below, then
4
3
2
measure the second foot.
5
4
3
LENGTH + WIDTH = SIZE
5
4
It’s very common to have one foot longer than the other,
so you want to measure both feet. Just identify the longest
5
and widest measurement in the box above. That’s your child’s
size. Remember to re-measure for every purchase as a
child’s foot can grow up to one half shoe size every
three months.
WIDTH RULER
To see the Simple Size Guide online,
go to
ADVERTISEMENT
0 votes
Related Articles
Related forms
Related Categories
Parent category: Life
 1
1


